


Cinema Sign 4 deployment
Deploy Cinema Sign
Install the player, confirm your programme and media, then test the display’s behaviour before adding more screens.
Check the actual hardware
Connect the display and a stable network. Check available storage for your media library and confirm the device’s reported capacities. ADB is needed for some restricted devices, not every installation.
Install and open once
Install the signed Cinema Sign APK, launch it and accept the Terms of Use. Use the administration address shown on the TV, normally HTTP port 8888.
Connect the cinema’s programme
Try the demo, then choose your provider under Settings → Player. Test the connection where available, save and run Import now. Check films, dates, times and publication rules.
Prepare the screen
Choose content type, layout and classification region. Configure d-cine media access or upload assets. Review downloaded posters and trailers before public display.
Check unattended startup
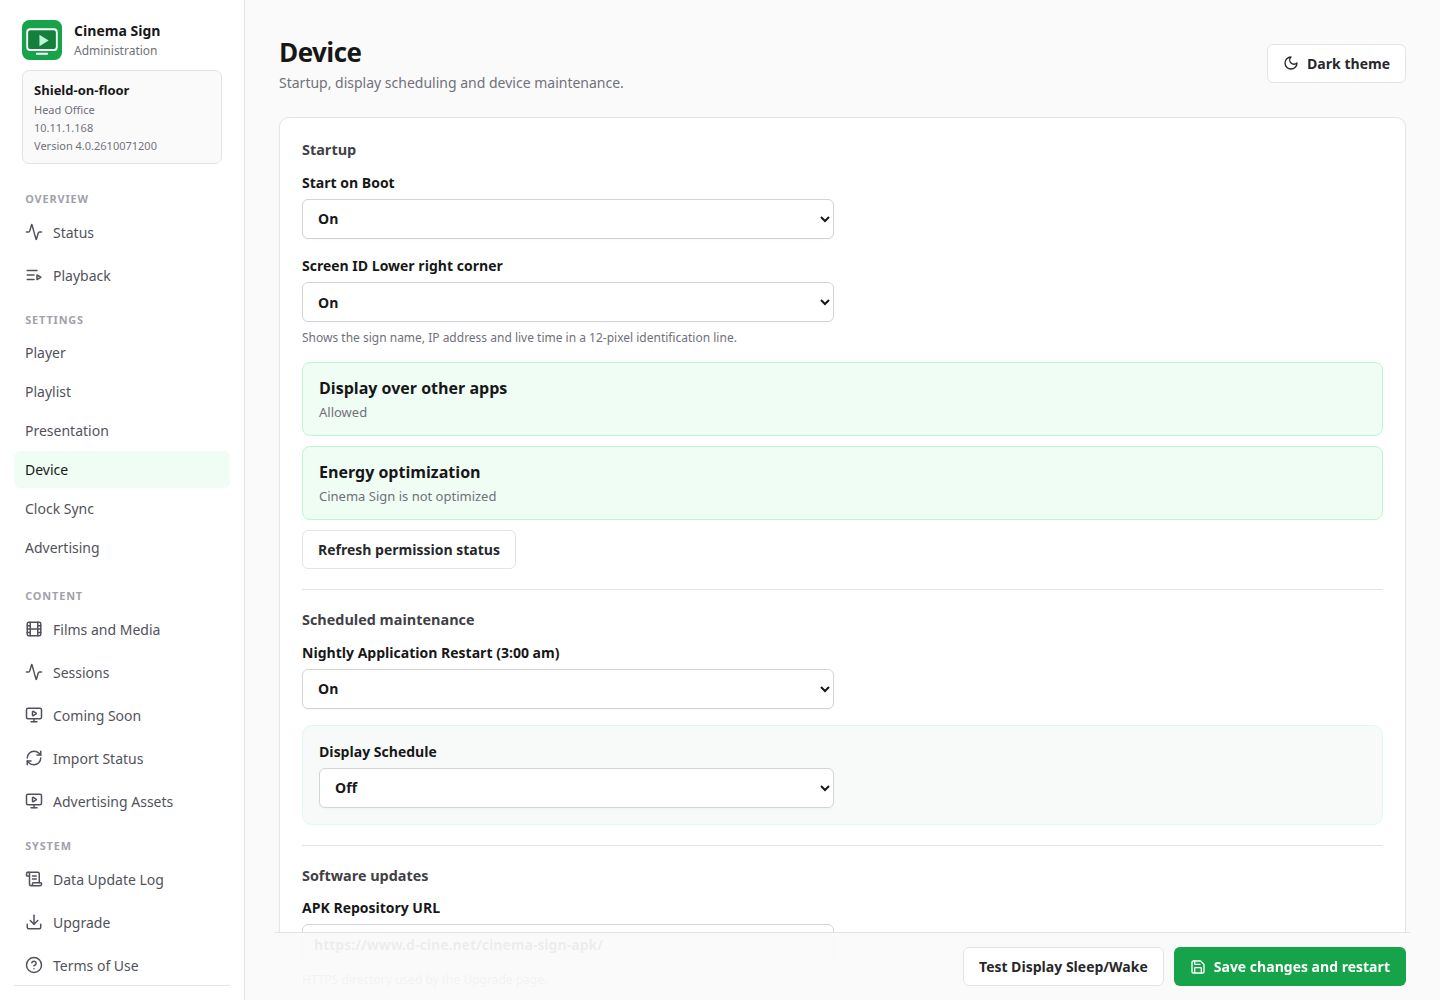
Enable Start on Boot and follow the applicable Device-page permission checks. Allow Display over other apps and adjust energy optimization where supported; check exact alarms where required. Test actual boot and scheduled wake.
Add campaigns and other screens
Test advertising on one player. Then add master data sharing and clock synchronization if needed. Keep layout and advertising choices explicit for every follower.
NVIDIA Shield quick install
Install using the remote.
Use Downloader by AFTVnews on the Shield to reach the official APK page. No computer beside the screen is needed for this route.
- Install Downloader by AFTVnews from Google Play, open it and enter
https://www.d-cine.net/cinema-sign-apk/get.php. - Select a release and Download APK. If prompted, allow installation from Downloader, then return to the Android installer.
- Open Cinema Sign once and accept the Terms of Use on the television.
- Using the Shield remote, enable Settings → Apps → Special app access → Display over other apps → Cinema Sign.
- Disable energy optimization for Cinema Sign under Special app access. The allowed state may be labelled Not optimized or Don’t optimize.
- Open web administration, set Settings → Device → Start on Boot → On and save. Check any exact-alarm permission needed for schedules/recovery.
- Restart the Shield and confirm Cinema Sign opens. Recheck permissions after a device-system update.
Installer permission, background-launch permission and Start on Boot serve different purposes. The player must have been opened once. Menu labels vary with device firmware; the detailed Shield guide includes checks.
Open local administration.
Use the address shown on the TV, including its port: http://PLAYER_IP:8888/. Sign in with username admin and password d-cine.
These are shared defaults. Keep administration on a trusted local network; do not publish the interface directly to the internet. A phone must be able to reach the player on that network.
New installations use the public CinemaShowtimes demo feed. Settings → Player → Set demo source selects it again. It is demonstration cinema data, not your own venue’s programme.
Verify your own feed
- Correct venue and complete programme
- Dates and player timezone
- Cancelled/private events excluded
- Correct classification territory
- Stable titles and media matches
- Import errors visible and understood
Connection details for the core sources.
Under Settings → Player, select Provider and enter its connection fields. Test where available, save, then use Import Status → Import now for imported sources. Manual mode has no import step.
| Input | Fields and access | Check before use |
|---|---|---|
| Manual | Maintain Films, Sessions and Coming Soon locally. Configure the optional d-cine Media API key before switching to Manual; its key fields are shown for external sources. | No vendor schedule account is needed. Confirm film eligibility and dated sessions. |
| CinemaShowtimes OpenAPI | Feed URL returning CinemaShowtimes-JSON 1.1. | Correct cinema, classification territory and dated session times; media URLs reachable. |
| Follow Cinema Sign Master | Master Player URL, including HTTP port 8888. | Master reachable from each follower. Presentation, playlist and advertising remain local choices. |
| BLOAD.TXT / BLOAD - TaPOS | Retrieval Method URL: HTTP/HTTPS file address. FTP: host, port, username, password and remote path; passive mode. Test URL or Test FTP parses the selected format. | Choose the correct format. TaPOS times have no dates and become today's sessions. Titles may be truncated; media matching may need manual correction. |
| TaPOS / MEDIA2 | TaPOS MEDIA2 Feed URL, venue timezone, optional screen codes and Coming Soon Handling. | Verify dated public performances, all imported films and the chosen Coming Soon policy. This is separate from BLOAD - TaPOS. See the illustrated setup. |
| Veezi | Veezi API URL and venue API Token, supplied for your site. | The retained reader fetches films/sessions through the v1 API. Previous successful testing is confirmed; check your current venue programme. |
| VenueMaster | VenueMaster Endpoint URL and optional Poster URL Template. Leave the template blank to derive it from the endpoint; use the endpoint Test button. | Current/Coming Soon titles, sessions and poster access. Use the actual venue endpoint/port. |
| Vista · beta | Vista API URL, Authentication URL, GAS username/password, descriptive Client ID, Site ID and Vista-supplied Connect Region Code. | Digital Platform/OCAPI licensing and site permissions must be enabled. Reader requests site films and fourteen days of showtimes. Venue acceptance required. |
| movieXchange · beta | API URL, Authentication URL, username/password, descriptive Client ID, API Client Secret, Cinema Chain ID and Site ID. Obtain licensed MX Showtimes access from the vendor. | Confirm vendor-approved secure service access/caching or a server relay and accept the venue programme. Public documentation is not test credentials. |
movieXchange's configured production defaults are https://api.moviexchange.com and https://auth.moviexchange.com/connect/token; use the service details supplied for your account. The provider catalogue links each additional ticketing reader to its credential, mapping and publication rules.
Prepare media and presentation.
- Select Settings → Presentation → Content Type: Poster, Trailer, Session Times, Custom Display Module or Live HTML Page.
- For posters, select the actual mounted orientation, Poster Delay and Fill/Contain. For session boards, select the layout and time format.
- Select the Classification Region or Disabled. Check imported classification values before public use.
- Configure the d-cine Media API key under Player settings if using its catalogue. Search/select the intended poster and trailer, or upload local files.
- Check cached media and available storage. A title can exist without media or sessions; playlist eligibility is a separate control.
- For custom boards, install a module ZIP and select it. For whole-screen Live HTML Page, enter its URL and set reload seconds, or 0 for self-updating pages.
Test advertising before scheduling it.
- Under Settings → Playlist, use Clock-synchronized playback.
- Add assets on Advertising Assets. For live weather/news, choose Poster adverts → Add URL Poster, then enter its name/description and complete HTTP/HTTPS URL.
- Enable the asset, choose weight greater than 0 and confirm campaign dates. Save asset settings.
- Under Settings → Advertising, enable the appropriate poster or trailer advertising on this player and set the interval. Save the settings.
- Check Playback/Up Next and the physical display. URL preloading is bounded to one future page, up to 30 seconds ahead. Confirm your page animates and fits without scrolling.
With Poster Delay 7 seconds and advert interval 10 seconds, poster adverts start every 14 seconds, occupy 7 seconds and then return to the programme. A video advert waits for the current video to finish. Each follower must have advertising enabled separately.
Share data and align clocks separately.
Master data sharing
Configure one player’s cinema source, then select Follow Cinema Sign Master on followers and supply the master address. Allow access to its HTTP server on port 8888. Films, sessions and media are shared; follower presentation and advertising stay local.
Clock synchronization
Enable Player Clock Sync, allow UDP port 39427 and disable client isolation between players. Start with Automatic clock role. Check the elected master and drift; do not force two clock masters. Use offsets only to correct observed display latency.
Identical playback needs matching content, playlist formula/seed/timing and advertising choices, as well as aligned clocks. Sharing the same URL does not synchronize a third-party page’s animation.
Before leaving it unattended
Run a practical acceptance check.
- Boot the device and confirm automatic player startup
- Test display off/on and nightly restart with the actual television
- Run a short advert cycle, then restore the intended campaign interval
- Check portrait rotation, transitions and visible live-page animation
- Check every intended follower’s settings and clock status
- Confirm all media downloads finish and enough storage remains
- Check recovery with Android’s required permissions in place
- Review imports, cancellations and dates across a day change
- Check operation during a temporary source/network interruption
- Observe a multi-day pilot before expanding to more screens
Cached film assets reduce network dependence. Fresh imports and URL pages still need connectivity. Force stop disables Android alarms until reopening; it is not a valid process-kill recovery test. HDMI-CEC power control is best-effort and varies by player/TV.
Know what the player actually has.
RAM, total flash capacity and free app/media storage are different measurements. Android’s data partition is smaller than the complete flash device because the system uses other partitions; available RAM changes as apps run. Swap is not physical RAM.
Check the device’s actual usable capacity rather than relying only on a sales listing or a firmware summary. Some low-cost firmware can report inconsistent memory figures. For diagnostic ADB measurements, see the hardware verification guide. Do not fill the device to its storage limit, and test heavier web pages alongside your real poster transitions.
Retail Fire OS can restrict startup and screen-power controls. Follow the Fire TV provisioning guide and test the actual device; app restart is not the same as rebooting Android or guaranteeing television wake.
Reduce avoidable storage writes.
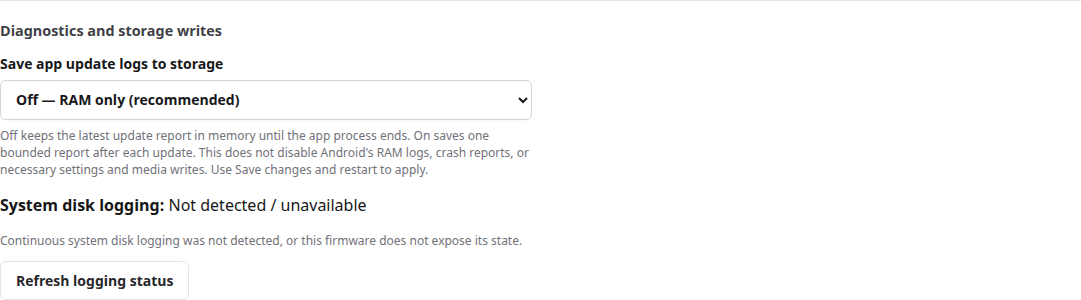
Keep Settings → Device → Save app update logs to storage Off for normal operation. The latest bounded update report remains in RAM until the app process ends. Enable storage temporarily when debugging a restart. Ordinary Android logs use rotating RAM buffers; continuous disk logging is a separate privileged collector that vendor firmware may enable.
The Device page reports system disk logging and offers controls only after privileged access is confirmed. Stock apps cannot change protected Android logging settings. Check developer logging/tracing options during installation and verify again after reboot. Keep media cached rather than deleting and downloading it repeatedly; choose a resync interval appropriate to schedule changes. Crash reports and essential Android, settings and media writes remain.
Illustrated operator steps → · Logging controls and installer/ADB checks →
Upgrade with the same signing identity.
Use the player’s Upgrade page to browse/download an official APK, then approve Android’s installer. Installing a newer compatible package over the existing app retains its settings and media; uninstalling or clearing app data removes them. Record important settings before rollout and verify imports, advertising and startup afterwards.
The website download listing determines which releases are published. A locally built APK is not published until it has been copied and verified on the release server. See the for build/publish procedures.