


The operator manual · 1.0.1 beta
A practical guide
to the whole player.
From your first upload to a seasonal programme, connected equipment and reliable daily operation.
No matching chapters
Try a shorter term such as playlist, cue or restart.
01 / Start here
Your first playlist
Non-Sync Player turns an Android TV device into a locally controlled audio player. Audio files are stored on the device. A browser on the same network manages the library, playlists, schedules and connected equipment. The TV shows the current track and active playlist.
- Install the signed Non-Sync Player APK and open it on the TV.
- Find the Browser control address at the bottom of the TV display. On your computer or phone, open
http://PLAYER_IP:8888/. - Sign in with username
adminand initial passwordmusic. Under Settings → Administration password, choose a new password of at least eight characters. Keep it in your venue's password manager. - Open Media pool. Drop MP3/WAV files into the upload area or use Choose files. Wait until the files appear in the library.
- Open Playlists → New playlist. Give it a useful name, add tracks, choose their order and save.
- Open Playback and choose the playlist using Load playlist. This starts it from the beginning.
- In Settings, select the Startup playlist and save. Complete the appliance setup before expecting unattended restart.
A single player needs no master, slave or UDP audio configuration. Add those modes when several devices need coordinated playback.
Use the supplied files only where you have the necessary playback rights. The application does not supply a music subscription or a music licence.
Back to contents ↑02 / Browser access
Connect to the player
The player serves its own control website on TCP port 8888. Your browser and Android TV device need a reachable connection on the local network. No companion desktop application is required.
Find the right address
Use the address displayed on the TV, for example http://192.168.1.40:8888/. Replace the example with your device's address. If DHCP changes that address, reopen the address shown on the TV; a DHCP reservation can give a venue a consistent address.
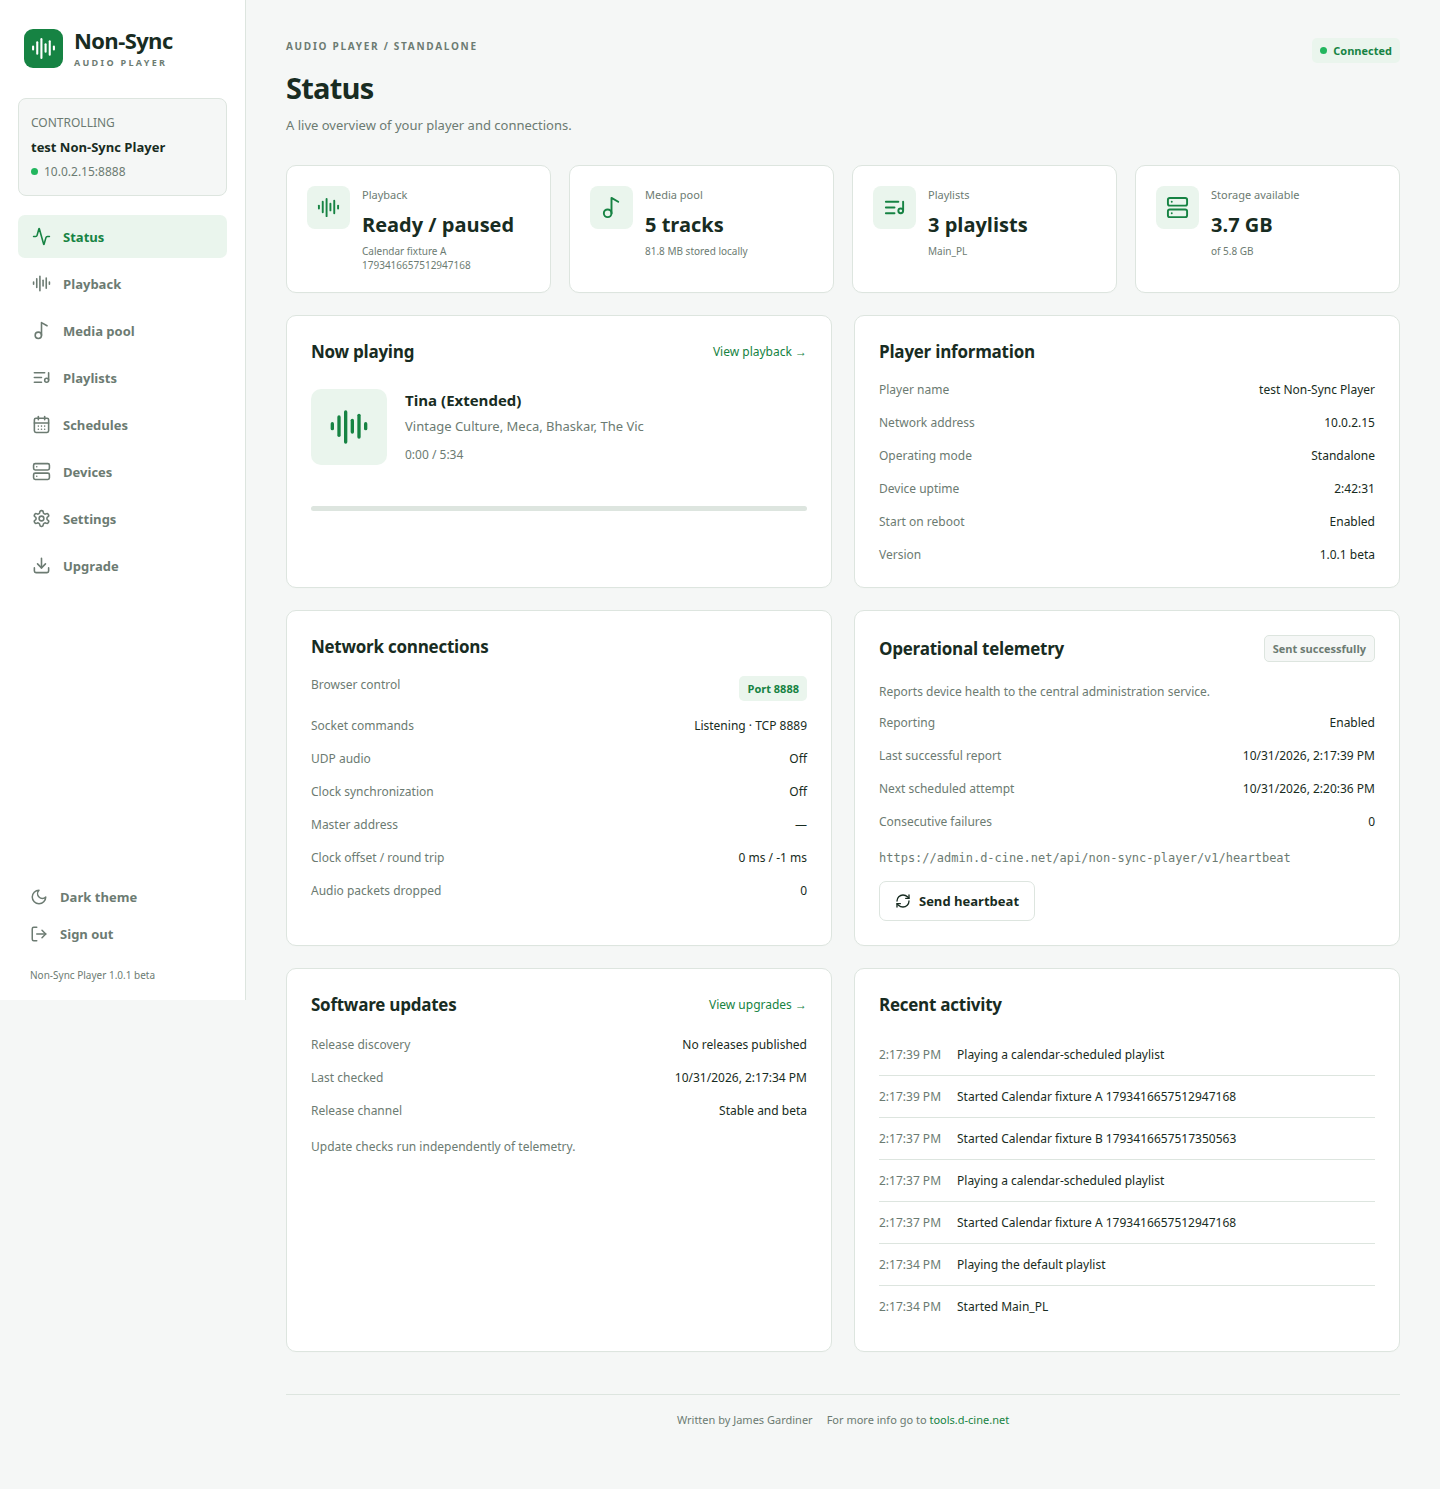
10.0.2.15 is inside the emulator's virtual network. On the development computer, forward a host port and use http://localhost:18888/. The screenshots show an emulator; their displayed IP is not an address to use for your own TV.
adb -s emulator-5580 forward tcp:18888 tcp:8888
# Open http://localhost:18888/ on that computer.
Signing in and sessions
The initial account is admin / music. An upgrade preserves an existing custom password. Browser sessions expire after about 24 hours or when the app restarts. Changing the password signs out other browser sessions while retaining the session that made the change.
Keep the browser interface, command listener and audio transport on a trusted local control network. The embedded website uses HTTP, and socket/UDP traffic is not encrypted. Do not forward these ports directly onto the internet.
Back to contents ↑03 / Find your way
The eight control pages
| Page | Use it for |
|---|---|
| Status | Current playback, storage, network/sync state, telemetry, release discovery and recent activity. |
| Playback | Load a playlist, play/pause, stop, skip, seek, change volume and inspect the active queue. |
| Media pool | Upload, preview, categorise, filter and remove audio files. |
| Playlists | Create named ordered playlists, set repeat and attach device cues to audio-file occurrences. |
| Schedules | Choose playlists for inclusive date ranges, annual seasons and overlapping priorities. |
| Devices | Save TCP/UDP destinations and send deliberate test messages. |
| Settings | Startup, player mode, networking, volume, reporting, password and Android appliance permissions. |
| Upgrade | Check releases, select a channel, transfer an APK and request installation on the TV. |
The navigation collapses behind its menu button on a phone. Light and dark themes are browser preferences. Saved player settings belong to the Android device, so a second browser sees the same library and configuration.
04 / Daily operation
Playback and the TV display
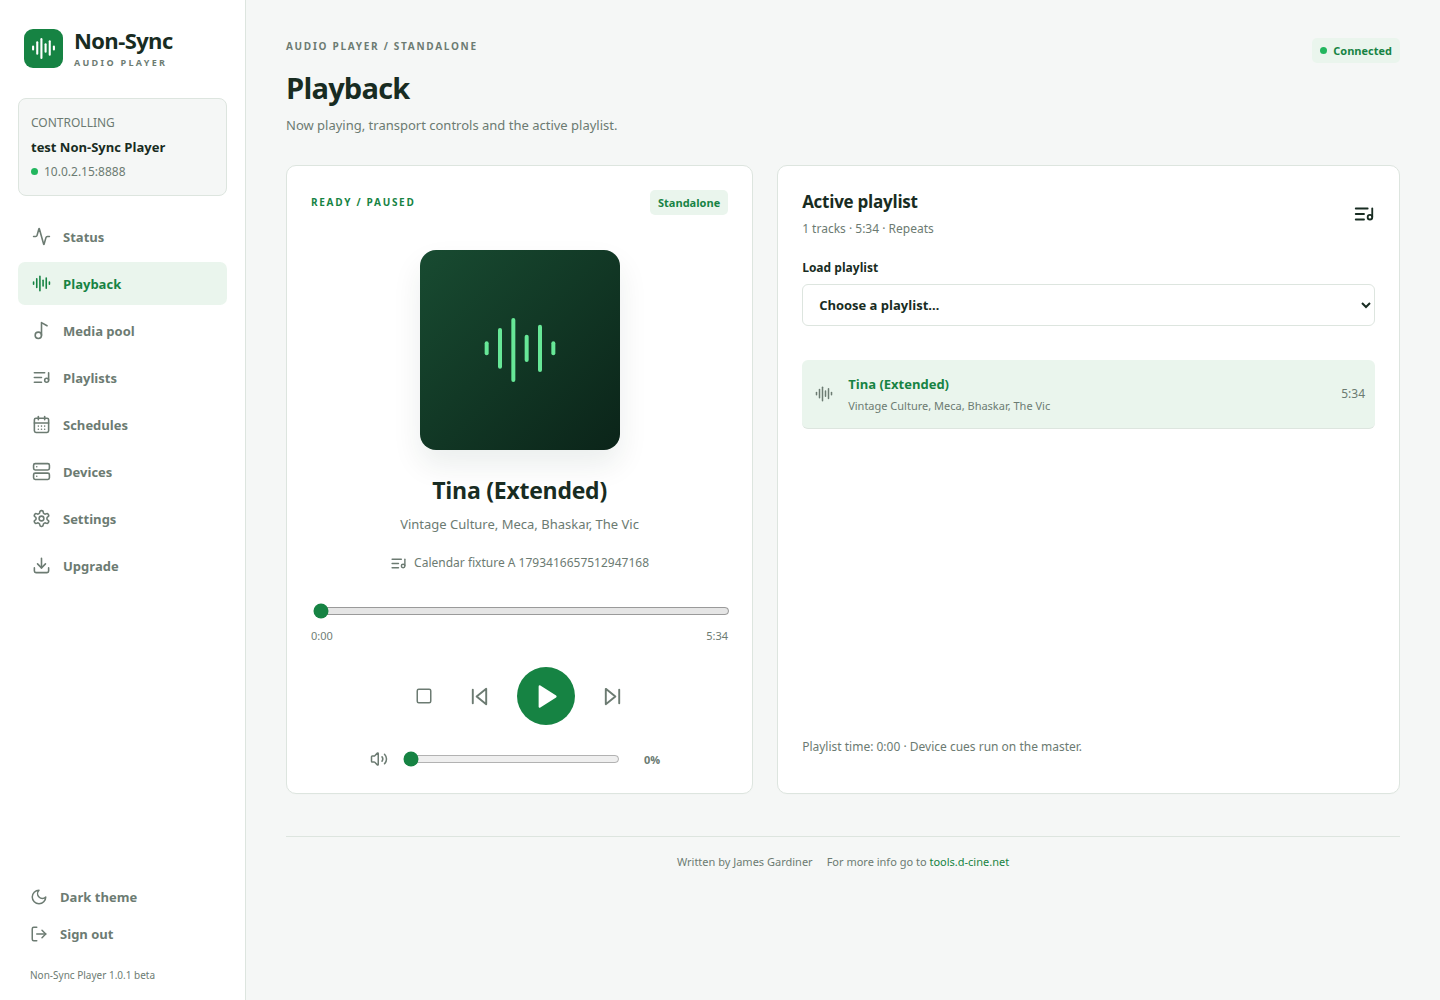
Load playlist starts the selected playlist at its first track. Play resumes the active playlist; if none is active, it uses the startup playlist. Pause holds playback. Stop ends playback. Previous/next and the queue let you move between tracks; the seek bar moves within the current track.
The TV displays the player name, operating mode, installed version, current track, artist, progress and active playlist. It also shows the local browser address and remote-control shortcuts. Artist/title text comes from the audio metadata when available; otherwise the filename supplies the title.
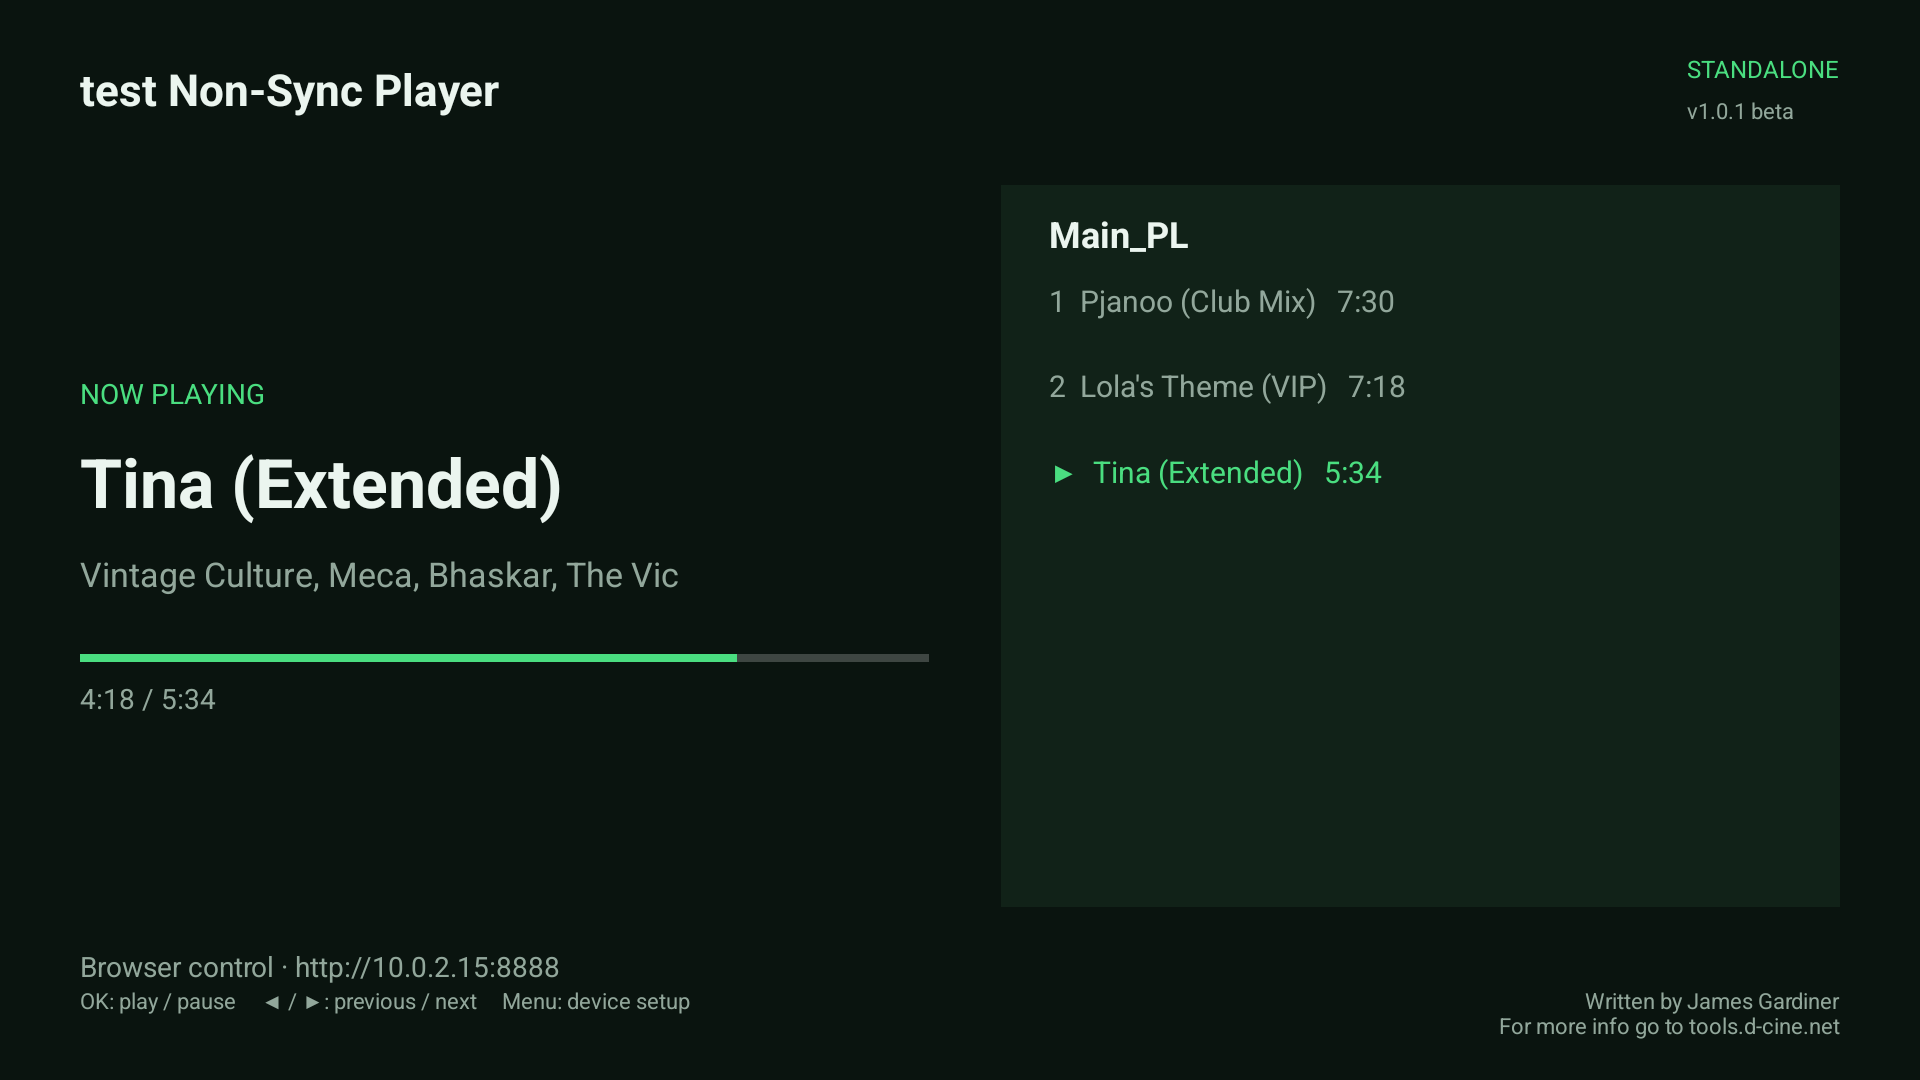
| TV remote | Action |
|---|---|
| OK / centre | Play or pause |
| Left / right | Previous / next track |
| Menu | Android appliance setup shortcuts |
| Back | Choose Android TV, Stop and exit, or Keep playing |
Returning to Android TV allows audio and browser control to continue. Stop and exit stops the playback service and cancels its normal recovery alarm. A slave follows its master: send transport commands to the master.
Playing, pausing, stopping, skipping or seeking manually holds that choice until the next local date or a different winning schedule/default selection. Use Schedules → Follow calendar to resume the scheduled choice immediately.
05 / Your audio library
Upload and organise media
- Open Media pool.
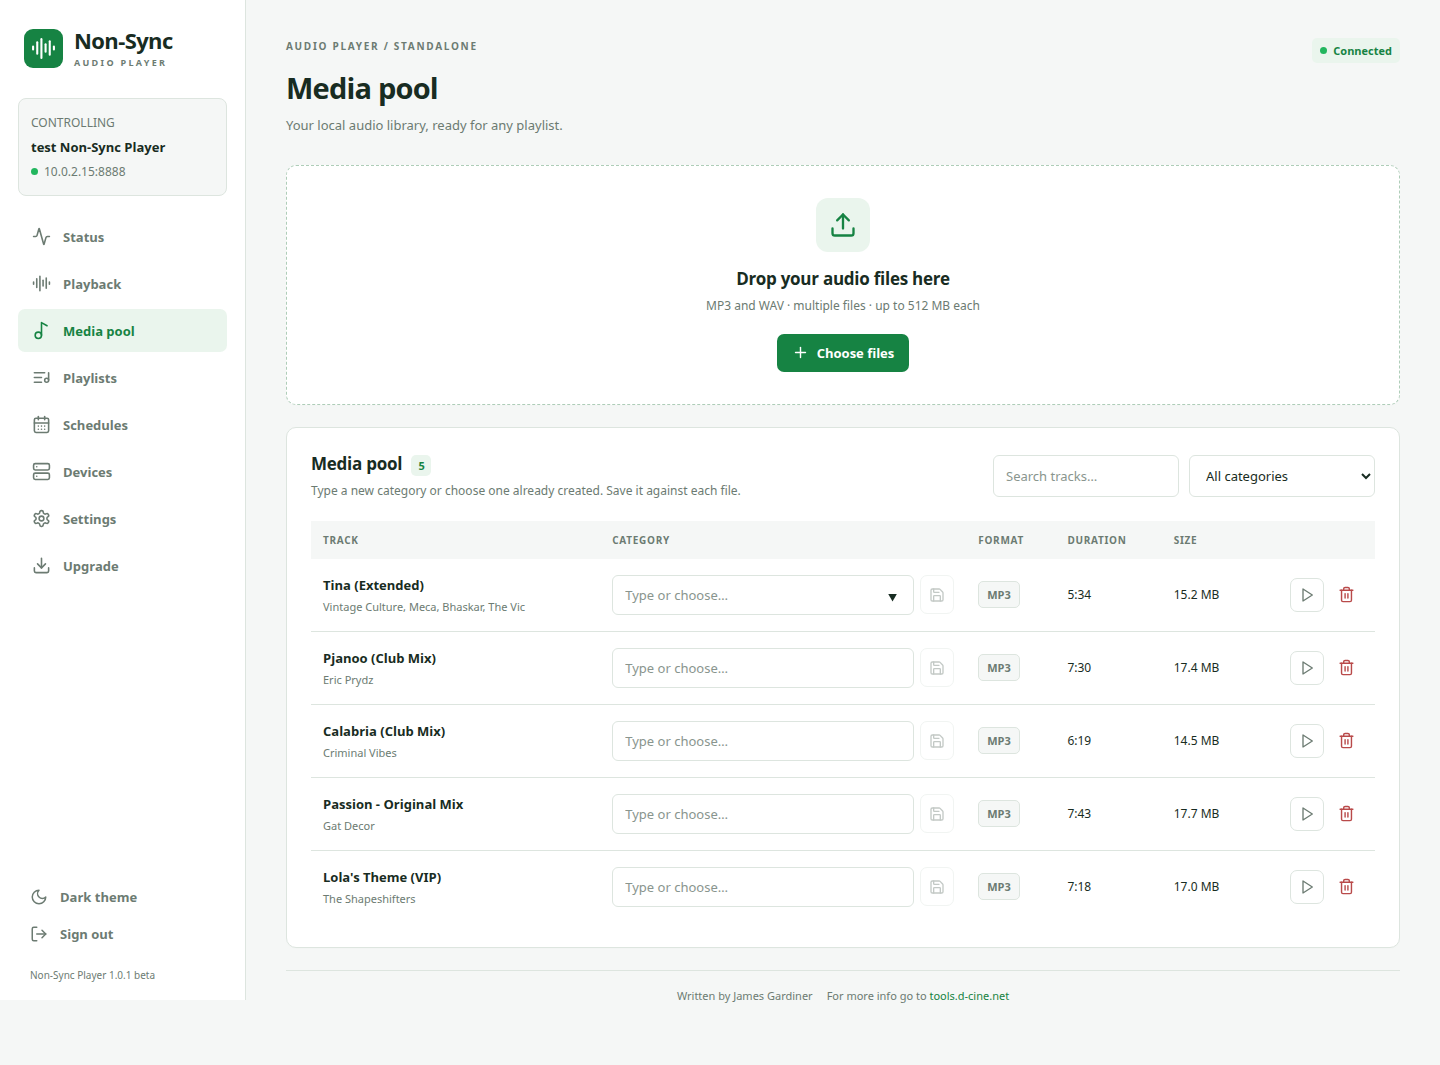
- Drag MP3 or WAV files onto the upload area, or select Choose files to use your computer's native file selector. Multiple files are supported.
- Wait for each file's progress and result. A successful upload appears in the pool; an invalid or incomplete upload does not become a playable item.
- Preview the audio in the browser when needed. A preview plays on the computer or phone running the browser.
- Type a category beside the item, or choose an existing suggestion, then select its save icon.
Categories and filters
Categories are user-created labels such as Foyer, Announcements, Christmas or Halloween. Category suggestions are shared across the library. Changing capitalisation reuses an existing matching category. Clearing a file's category removes that assignment, while keeping the category name available for reuse. Media pool and playlist-picker filters help you find the right audio.
Formats and storage
Each uploaded file can be up to 512 MB, subject to free device storage. MP3 and PCM16 mono/stereo WAV have been verified on the emulator. Other WAV encodings depend on Android's decoder and must be tested on the target device. Output is decoded PCM16 mono/stereo; playback is not guaranteed to be gapless.
Check the storage figure on Status before a large upload. Uploaded audio stays on the Android TV device and can play without internet access. Clearing app data or uninstalling removes that local library; keep original files elsewhere.
A file referenced by a playlist cannot be deleted. Remove its playlist entries first. Reusing a media item in several playlists does not require uploading another copy.
Back to contents ↑06 / Build the running order
Create and edit playlists
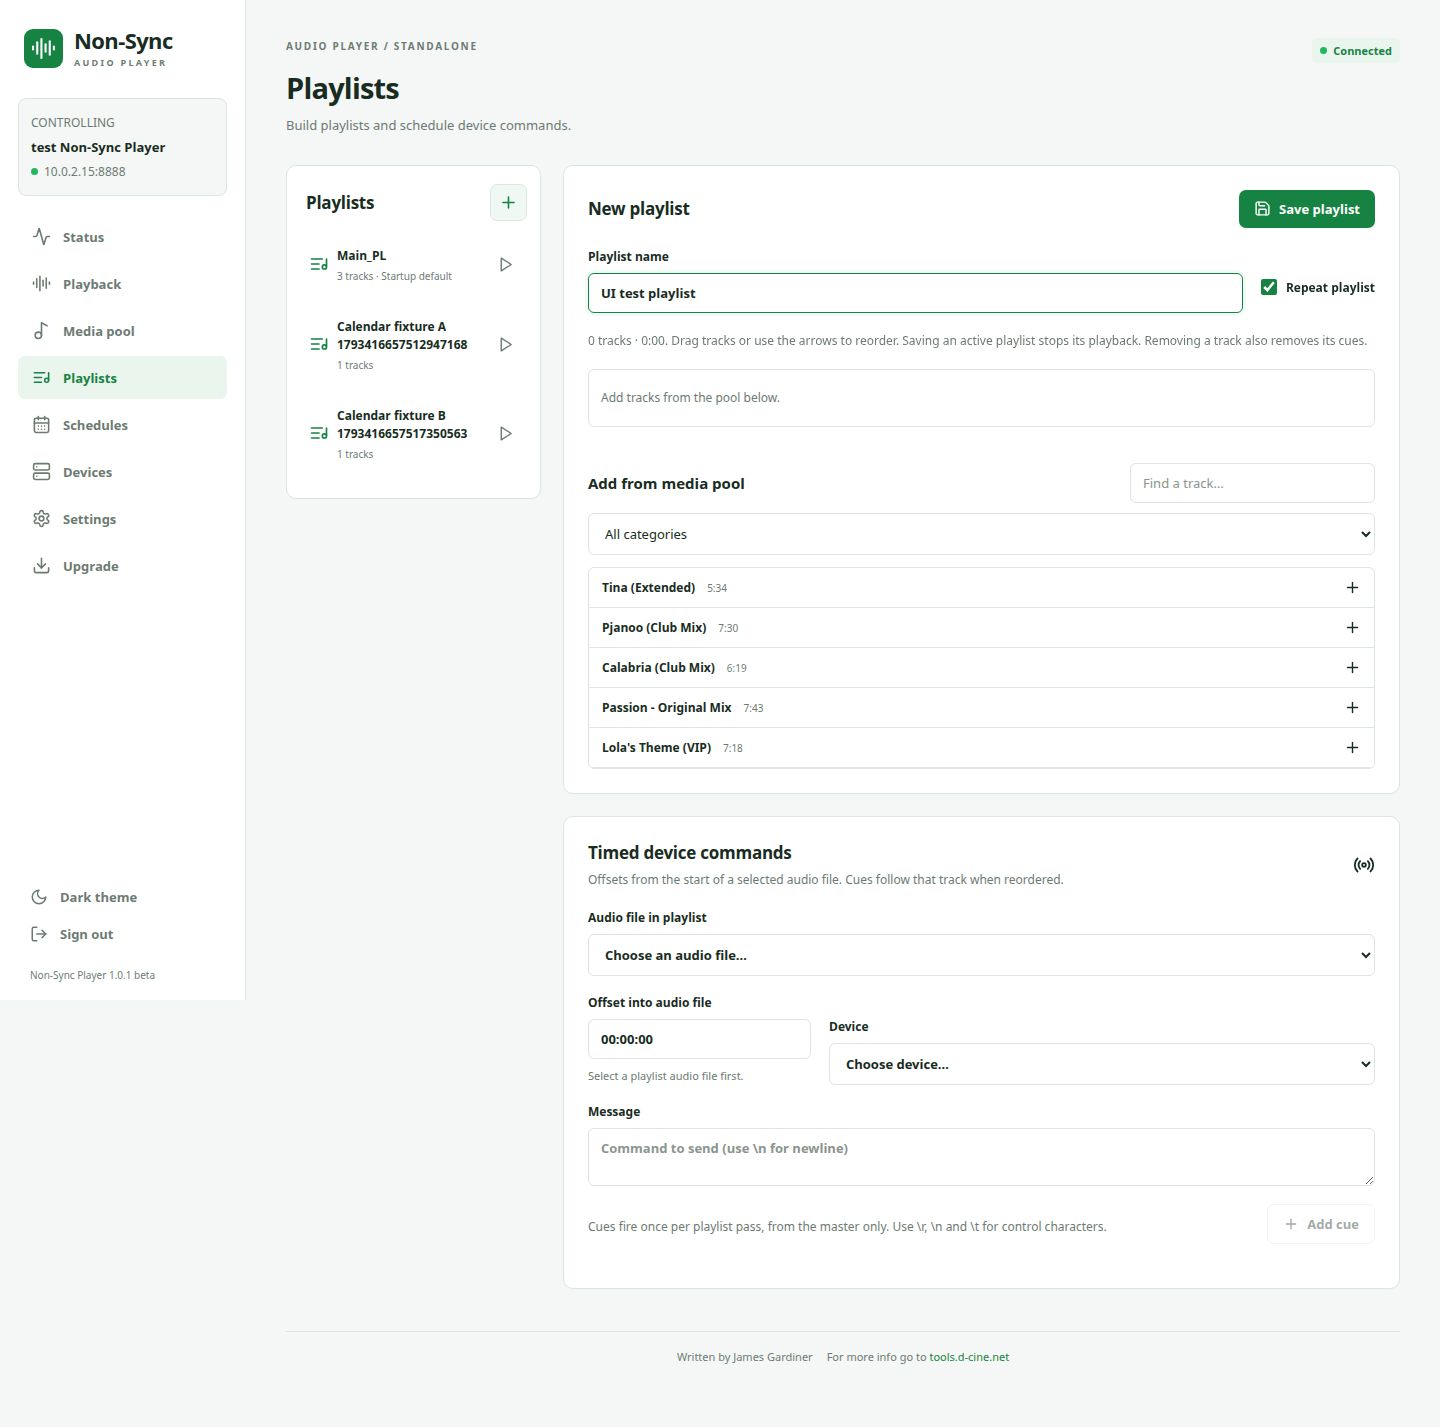
- Select Playlists → New playlist and enter a unique name that your operators and automation system will recognise.
- Add tracks from the media picker. Use its search and category filter when the pool grows.
- Drag tracks or use the up/down buttons to change their order. The same audio may appear more than once; each occurrence is a separate entry.
- Choose Repeat playlist if the list should loop. With repeat off, the list finishes at its end.
- Add any timed device commands, then select Save playlist.
- Load the playlist on Playback. Save it as the Startup playlist in Settings if it should be the normal automatic selection.
This allows edits to take effect on the next start. After saving, load it again, or select Schedules → Follow calendar to resume the automatic selection.
Removing an entry also removes the cues attached to that occurrence. Reordering preserves its cues. Before deleting a playlist, remove any calendar schedules that reference it. The current limits are 2,000 entries and 500 cues per playlist.
Back to contents ↑07 / Seasonal programming
Schedule playlists by date
Use Schedules to make a Christmas, Halloween or other date-based playlist take over automatically. Dates cover whole days in the Android device's timezone, shown at the top of the page. Set the Android date, time and timezone correctly before relying on schedules.
- Create and save a playlist containing audio.
- Open Schedules → Add schedule and select it.
- Choose Start date and End date (inclusive). For one day, choose the same date twice.
- Enable Repeat every year for a recurring season. The first chosen start date is the earliest activation; after that, annual matching uses month/day.
- Leave Enable schedule checked. Set a priority from 0 to 100, then save.
| Example | Configuration |
|---|---|
| Halloween | 31 October → 31 October, annual |
| Christmas period | 1 December → 26 December, annual |
| New Year season | 20 December → 5 January, annual; a range may cross New Year |
| One-off event | The event's actual start/end dates, annual disabled |
These are configuration examples, not supplied playlists. An annual 29 February-only window has no matching day in a non-leap year.
Which playlist wins?
The highest-priority enabled matching schedule wins. A tie uses the most recent effective start date, then a stable schedule ID. Missing or empty playlists are ignored. Outside the scheduled windows, the Startup playlist runs. The playlist's own Repeat setting determines whether it loops.
The selection is checked at startup and during operation, including local date boundaries. Editing a future schedule does not interrupt current playback unless the winning selection changes. Manual transport holds an override until the next local date or winning selection change; Follow calendar clears that override now.
A slave follows its master, so configure the calendar on the master. This is a whole-day calendar; it does not offer an hour-by-hour timetable.
Back to contents ↑08 / Network equipment
Add TCP and UDP devices
A device is a saved network destination for outgoing cue messages. Use it for equipment with a documented text-based socket protocol, such as an automation processor or amplifier. The player sends the message you enter; it does not translate vendor commands.
- Open Devices → Add device.
- Enter a unique descriptive name.
- Choose TCP or UDP, then enter the hostname/IP and destination port.
- Save. If appropriate, choose Test, enter an agreed safe message and select Send message.
Confirm the destination and command with the equipment's documentation. Avoid live lighting, mute, power or show-control changes while the venue is operating.
TCP opens a connection for each command, writes its UTF-8 bytes and closes it. It does not wait for a device acknowledgement. UDP sends a datagram; a subnet broadcast address can reach multiple receivers where the network permits it. Neither mode guarantees the remote equipment acted on the message.
Device names, addresses, ports and messages are examples in the documentation. Replace them with values accepted by your own equipment. A device referenced by playlist cues cannot be deleted until those cues are removed.
Back to contents ↑09 / Audio-file automation
Attach a cue to a track
Each cue belongs to one occurrence of an audio file in a playlist. Its offset starts at that file's beginning, so moving the entry preserves the cue's relationship to the audio.
- Add the destination under Devices.
- Edit the playlist and find Timed device commands.
- Choose the exact occurrence using Audio file in playlist.
- Enter Offset into audio file as
HH:MM:SSorHH:MM:SS.mmm. It must be before that file ends. - Select the device and enter its message. Use
\r,\nand\twhere its protocol requires carriage return, newline or tab. - Select Add cue, then Save playlist. Start a controlled test playback and verify the receiving equipment.
Audio-file occurrence: 2. Welcome announcement
Offset into audio file: 00:00:12.500
Device:                Example automation processor
Message:               EXAMPLE_COMMAND\r\n
The command above is illustrative, not a vendor protocol. No line ending is appended automatically. A file repeated twice in a playlist has independent cue positions for each occurrence.
What happens when playback changes?
- Pausing holds the cue clock.
- Each enabled cue fires once per playlist pass. A repeat starts another pass; starting the playlist again resets the cues.
- Skipping forward or seeking forward does not fire the commands you passed over.
- Seeking backwards does not resend a cue that already fired in that pass.
- A zero-offset cue fires when its selected entry begins, including a directly selected entry.
- Only the standalone player or master sends cues. Slaves do not duplicate equipment commands.
Sending is asynchronous. Failures appear in recent activity and are not automatically retried. Older version 1.0.0 playlist-time cues are migrated to file offsets while preserving their timing in the existing running order.
Back to contents ↑10 / Incoming automation
Control playback over a socket
The optional Socket command listener accepts TCP connections, using port 8889 by default. Settings can change the port, disable the listener or require a token. This listener starts playlists; it is separate from outgoing device cues.
Send UTF-8 with one command per line and an actual newline terminator. Each response is one JSON line. A failed command returns {"ok":false,"error":"…"}. Names are case insensitive; a playlist ID can also identify the list.
PLAY Foyer Music
PAUSE
PLAY
NEXT
PREVIOUS
STOP
STATUS
PLAY Foyer Music starts that list from the beginning. PLAY resumes the active list or uses the configured default. STATUS reads current state without creating a manual calendar override. Other manual transport commands do create an override.
Token-protected commands
If a socket token is configured, use JSON and include it in each command. The token is independent of the browser password. The placeholders below must be replaced; they are not real credentials.
{"action":"play","playlist":"Foyer Music","token":"YOUR_SOCKET_TOKEN"}
{"action":"seek","positionMs":30000,"token":"YOUR_SOCKET_TOKEN"}
{"action":"track","index":0,"token":"YOUR_SOCKET_TOKEN"}
{"action":"status","token":"YOUR_SOCKET_TOKEN"}
The track index is zero-based. Send transport commands to the master when operating a slave. Allow the listener through the venue's local firewall only where required; a token does not encrypt traffic.
Back to contents ↑11 / One player or several
Choose the operating mode
Select the mode in Settings → Operating mode, then save. Changing network-related settings can stop playback; confirm the intended playlist is playing afterward.
| Mode | What it does | Media needed |
|---|---|---|
| Standalone | Local playlists, calendar, browser/socket transport and device cues. | On this player |
| Master · synchronized source | Plays local audio, sends transport announcements and optionally broadcasts audio. | On the master |
| Slave · receive UDP audio | Receives and plays the master's timestamped decoded PCM audio. | No local pool required for the received audio |
| Slave · play matching local playlist | Follows the master's transport while decoding its own matching local files. | Matching playlist and audio on each slave |
Use one master on a LAN. A forced-master conflict is reported; resolve it before operation. Configure calendar schedules and outgoing equipment cues on the master. Browser and socket transport are rejected on slaves because they follow their source.
Choose synchronization only when your installation needs it. Independent rooms can each run their own standalone programme.
12 / Coordinated audio
Set up master/slave playback
Receive UDP audio
- Choose Master on the source and enable its audio broadcast.
- Set a broadcast address appropriate for the subnet and an agreed audio port.
- Choose Slave · receive UDP audio on the receiver, using the same audio port.
- Optionally set the master address to filter incoming audio/state. Clock discovery still needs LAN clock packets.
- Start the master's playlist. Confirm the slave locks its clock and receives audio.
Play matching local files
Upload matching audio and recreate the matching playlist on every local-media slave. Playlist name, file contents, order and repeat setting must match the master's. Audio is not automatically copied to these slaves. A transport mismatch prevents correct following.
Buffers and reliability
The audio buffer is configurable from 200–2,000 ms; the default is 400 ms. Output offset can be adjusted within ±500 ms. Use adequate master prebuffer for negative adjustments. Measure actual audible output on the installed devices rather than judging alignment from screen progress bars.
Slaves lock their clock before playing. Loss of master transport for about 2.5 seconds mutes a slave. A new master session can restart its sequence without permanently blocking the receivers.
Emulator tests cover transport, clock following and signal-loss handling. They do not establish acoustic alignment or sustained reliability on your boxes, audio outputs or Wi-Fi. There is no sample-accurate hardware-clock guarantee. The UDP audio format is specific to Non-Sync Player; it is not a general RTP or internet-radio receiver.
The player uses a separate clock/audio protocol from Cinema Sign, allowing both products to coexist without joining the same playback group.
Back to contents ↑13 / Unattended operation
Make the TV box an appliance
- In Settings, select a saved Startup playlist and enable Start player after reboot. Save.
- Under Android TV appliance setup, review Default HOME launcher and choose the player where the device supports it.
- Allow Display over other apps. This lets Android reopen the player after an update/restart when it is not the actual HOME launcher.
- Review energy optimisation, exact-alarm and APK-install access where applicable. The browser opens these screens on the TV, where a person may need to approve them.
- Check that the browser no longer reports incomplete automatic relaunch setup. If the HOME role is assigned but the firmware still resolves its built-in launcher, follow the displayed explanation.
- Test an application restart, a real APK upgrade and a full reboot. Check the TV display, browser access and audible playback each time.
The player keeps the screen awake and holds a partial wake lock during service operation. A recovery alarm is refreshed every 30 seconds and requests a relaunch after roughly two minutes without a healthy process. Optional Restart app daily uses the selected local time. These mechanisms remain subject to Android firmware and special-access settings.
Android Force stop disables automatic recovery until the app is opened again. Clearing app data or uninstalling also removes the library and settings. Avoid these actions when applying a normal upgrade.
Firmware can hide or restrict setup screens. A green HOME-role result alone does not prove the TV will use the player as its launcher. Acceptance on the actual box is essential; the recent emulator relaunch fault was resolved by enabling display-over-other-apps access.
Back to contents ↑14 / Keep the player current
Install a network upgrade
- Check automatic relaunch setup and confirm you can approve installation on the TV.
- Open Upgrade and choose Stable or Stable and beta.
- Select Check for updates. The player lists newer numeric version codes that match the chosen channel and this Android version.
- Select Download release, then wait for the Ready state. Published downloads verify SHA-256, exact version code, app identity and signing continuity.
- Select Install on TV. Allow installation from this source if requested, then approve Android's installation screen.
- Wait for the application to return. Confirm its displayed version, browser access and the intended startup/calendar playlist. The upgrade reports restarted only after the player returns.
Library, playlists, schedules, settings and a custom browser password are retained by a compatible update. Keep original media files separately. Android permissions and installation approval may still require attention at the TV.
Manual options
Choose APK uploads a compatible signed APK from your computer. Direct HTTPS APK URL downloads an APK from a direct address. The maximum transfer is 256 MB. Both check package identity, version and signing continuity; only a release-catalog download has a published checksum to compare.
No releases published means a successful empty feed. No compatible updates means the available entries do not offer a newer build for this channel/device. A failed check is reported separately. Release discovery works independently of heartbeat success and can be used with telemetry disabled.
Always use an APK supplied through the product's official distribution process. An incompatible signing key requires a separate installation strategy; do not uninstall simply to force a routine update.
Back to contents ↑15 / Daily checks
Status, storage and activity
Use Status for a quick operating check. Confirm the correct playlist and track, available storage, operating mode, socket listener, UDP/clock state and recent activity. Playback provides the detailed queue and transport controls.
- Before opening: listen at the actual audio output, confirm the intended programme and check that no manual calendar override is holding yesterday's selection.
- After an upload: confirm the files and categories, then test the playlist through the venue's audio system.
- After a network change: confirm the TV's browser address, device destinations and, where used, master/slave clock and audio.
- After an update or reboot: check foreground TV output, browser access, installed version and startup/calendar playback.
Recent activity contains local operational messages, including failed equipment sends. A TCP connection or UDP send is not an acknowledgement that remote equipment performed the action. Confirm important automation at the receiver.
Storage belongs to the Android box. Remove playlist references before deleting unused media. Keep source files and a written configuration record outside the device; the current interface does not provide a complete backup/export/import workflow.
Back to contents ↑16 / Operational reporting
Telemetry and privacy
Settings → Send operational telemetry controls reports to the central Non-Sync Player administration endpoint. Status shows reporting state, last success, next attempt and failures. Reporting is observational; the heartbeat endpoint is not a remote device-control channel.
Reports include the player display name, product-scoped hashed device identity, installation UUID, app version, hardware model, Android version, uptime, storage, playback/sync health, timezone, locale and fixed error codes. They exclude raw Android IDs, audio files, track names, media URLs, equipment messages and credentials. Choose a non-personal player display name.
A startup report is followed by a randomly staggered report within roughly 1–60 minutes, then hourly reports. Configuration changes also request a report. Failures back off for 2, 4, 8, 16 and then 24 hours. Send heartbeat respects failure backoff. Offline playback continues, and no disk queue of heartbeat history is maintained by the client.
Disabling reporting does not disable release checks. In central administration, Current/Late/Offline describe heartbeat recency; playback faults are reported separately. A heartbeat marked Current does not by itself prove audible output.
Back to contents ↑17 / Installer reference
Network ports and limits
| Purpose | Default | Notes |
|---|---|---|
| Browser control | TCP 8888 | Fixed embedded HTTP port |
| Incoming playlist commands | TCP 8889 | Configurable; can be disabled or token-protected |
| Clock discovery/election | UDP 39428 | Separate from Cinema Sign |
| Audio and transport state | UDP 39430 | Configurable; same port across a playback group |
| Outgoing equipment cues | Per-device TCP/UDP port | Use the equipment's documented port/protocol |
| Releases / reporting | Outbound HTTPS | Public product-specific endpoints on admin.d-cine.net |
Clock discovery and broadcast traffic must reach the intended receivers. Guest Wi-Fi isolation, VLAN boundaries, broadcast filtering and firewalls can prevent following even when browser access works. Use a subnet-appropriate broadcast address and test the actual venue network.
| Item | Current limit |
|---|---|
| Audio upload | 512 MB per file, available storage permitting |
| APK transfer | 256 MB |
| Playlist | 2,000 entries; 500 device cues |
| Calendar | 500 schedules; priority 0–100 |
| Incoming command line / cue payload | Up to 8,192 characters per incoming line; up to 8,192 UTF-8 bytes per cue message |
| Master buffer / output offset | 200–2,000 ms / ±500 ms |
The UDP stream uses the application-specific NSP1 packet magic and timestamped PCM16. Control state uses NSP_STATE_1. Use Non-Sync Player receivers; third-party UDP audio compatibility is not provided.
18 / Find and recover a fault
Troubleshooting
The browser cannot connect
Confirm the app is open on the TV, the displayed IP is current and the browser can reach that local network. Include http:// and :8888. On the emulator, use a forwarded host port rather than 10.0.2.15 directly. A disconnected page cannot send commands to a stopped player.
An update installed but the TV stayed on the launcher
Open Non-Sync Player manually. Review Settings → Android TV appliance setup, especially display-over-other-apps access and the actual resolved HOME launcher. Confirm Start player after reboot is enabled. Repeat the upgrade/restart acceptance check after setup; successful APK installation alone does not prove successful relaunch.
There is no sound
Check Playing state, current track, player volume, Android volume, HDMI/audio routing, amplifier input and speaker output. Try a known-good MP3 or PCM16 WAV. On a slave, inspect clock lock, master transport and signal-loss state. Browser preview audio is local to the browser, so hearing it there does not verify the TV's audio path.
The seasonal playlist did not start
Check the Android timezone/date, inclusive dates, enabled flag, first annual start date, priority and whether the playlist contains audio. Use Follow calendar to clear a manual override. Configure the calendar on the master, not a slave. A non-repeating playlist can finish within a multi-day window.
A cue did not operate the equipment
Check the exact audio occurrence, offset, enabled checkbox, destination, TCP/UDP choice and required line ending. A forward skip does not replay skipped commands. Only the standalone player/master sends cues. Inspect recent activity, then perform a safe controlled device test.
A slave is silent or out of time
Use one master. Check matching ports, reachable clock/audio packets and the master-address filter. For local-media mode, check matching playlist name, file contents, order and repeat. Review output offsets and buffers, then measure on the real audio outputs. A 2.5-second transport loss deliberately mutes the slave.
No updates are listed
Distinguish an empty catalog, no compatible newer release, and a failed network check. Confirm channel, Android compatibility and version code. A copied APK is not automatically discoverable unless its release metadata is also published.
I forgot the password
An upgrade preserves a custom password; the default applies only while none is saved. The interface does not provide password recovery. Contact the installer before clearing data, because a reset/uninstall removes local media and configuration.
What to record before asking for help
Note app version, Android device/model, operating mode, the exact failed action, whether the TV/browser/audio returned, and relevant recent activity. Describe the network arrangement and any master/slave configuration. Exclude passwords, socket tokens, personal data and token-bearing URLs from a support report.
Back to contents ↑